Northampton Scout Amateur Radio Group

GB4NDS


GB4NDS
A quick start guide to using an on-line (WebSDR) radio receiver to
listen to Amateur Radio transmissions.
WebSDR is a Software-Defined Radio receiver connected to the internet which allows many users to control it and to listen to radio broadcasts simultaneously. You can literally tune around the radio spectrum using you’re your own computer (connected to the internet) and a web browser. There are many WebSDR receivers out there but for the purpose of this guide I’m going to use the one hosted by the University of Twente in the Netherlands. This site is located in Europe so has good reception of a range of stations and it covers a wide range of frequencies from Long Wave (LW) and Medium Wave (MW) up to the Short Waves…you may recognise these terms from your normal household radios.
Start here
Start by pointing your favourite web browser to
University of Twente in the Netherlands.
You should find a web page that looks like the picture below (once you get past the pictures and text at the top of the
page).
Although the web page can look a bit confusing when you first arrive, with numerous controls, there
are actually only a few key things you need to know to get listening.
As soon as you load the page you should start hearing the hiss of radio reception…right now you
probably not tuned into anything. If you dont hear any noise or if the large waterfall
is not moving.
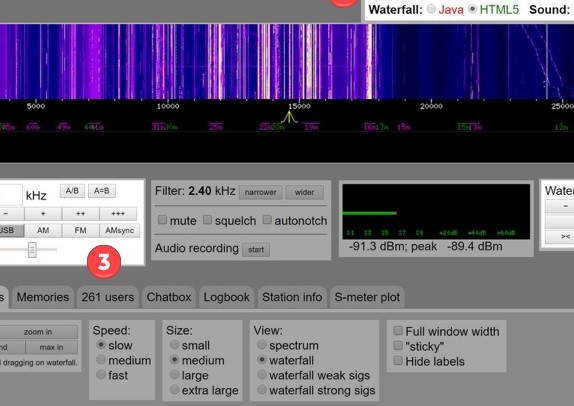
Click the button displayed towards the top left. It is marked
❷is not being displayed then look at the control labelled ❶ and select Java instead of HTML5.
- or -
Note that the interface presented to phone users is much simpler than that presented to
users on tablets and computers but the basic controls and method of tuning is exactly the
same. WebSDR viewed on an iPhone The colourful area labelled ❷is known as the waterfall and this is a graphical representation of the
radio signals being received across the spectrum. We can use this to spot where radio signals are to
help tune in on them. This section should constantly be scrolling upward and, in that way, we see
not only a real time visual picture of signals on the radio spectrum but also the last 5 – 10 seconds of
history. We can scroll up and down the spectrum by hovering the mouse over the waterfall and left
clicking and then moving sideways (either left or right) while holding down the left mouse button.
The frequency that you can actually hear is indicated by the little yellow marker at the bottom edge
of the waterfall . Similarly, to tune in a signal this can be grabbed
using the mouse and moved
left and right.
Fine tuning by using the mouse to move the yellow tuning marker can be tricky so control ❸allows
us to type a frequency directly into the control box and provides buttons to tune up (+, ++ & +++) or
down (-, --, &---) in small medium or large steps. The buttons below this that say
| Set mode to | Description | When to use |
|---|---|---|
| CW | Continuous Wave | Morse Code |
| LSB | Lower Side Band | Listening to Amateur Radio voice transmissions below 10 MHZ |
| USB | Upper Side Band | Listening to Amateur Radio voice transmissions above 10 MHZ |
| AM | Amplitude Modulation | Listening to Broadcast Radio |
| FM | Frequency Modulation |
Reception modes; you may have come across the term FM while using your car radio or AM on your home stereo. For now, we won’t worry about what these mean but the follow examples will simply use AM and LSB. Nearly there! One last control before we start…the Waterfall Zoom, ❹, allows us to zoom in on a close-up view of a specific frequency or zoom out to speed up tuning around.
Tuning in our first station
Let’s start by tuning in a loud broadcast station. These are commercial stations like the BBC or Radio
China International.
In the tuning control, ❸, type 7300 and hit enter. This will move the yellow tuning indicator to the
frequency 7300kHz or 7.3MHz which is near the middle of the 41m (41 metre) broadcast band.
Select the AM mode, button below where you just entered the frequency. Press the Waterfall
Zoom❹+ control about 5 times to start with. You should see something like the image below
and may already be hearing a radio station. If the tuning indicator is not roughly centre of screen use
you mouse to select the waterfall and drag it left or right to centre things. Remember, hover over
the waterfall before left clicking not the yellow tuning indicator…if you click on that and drag you will
retune to another frequency.
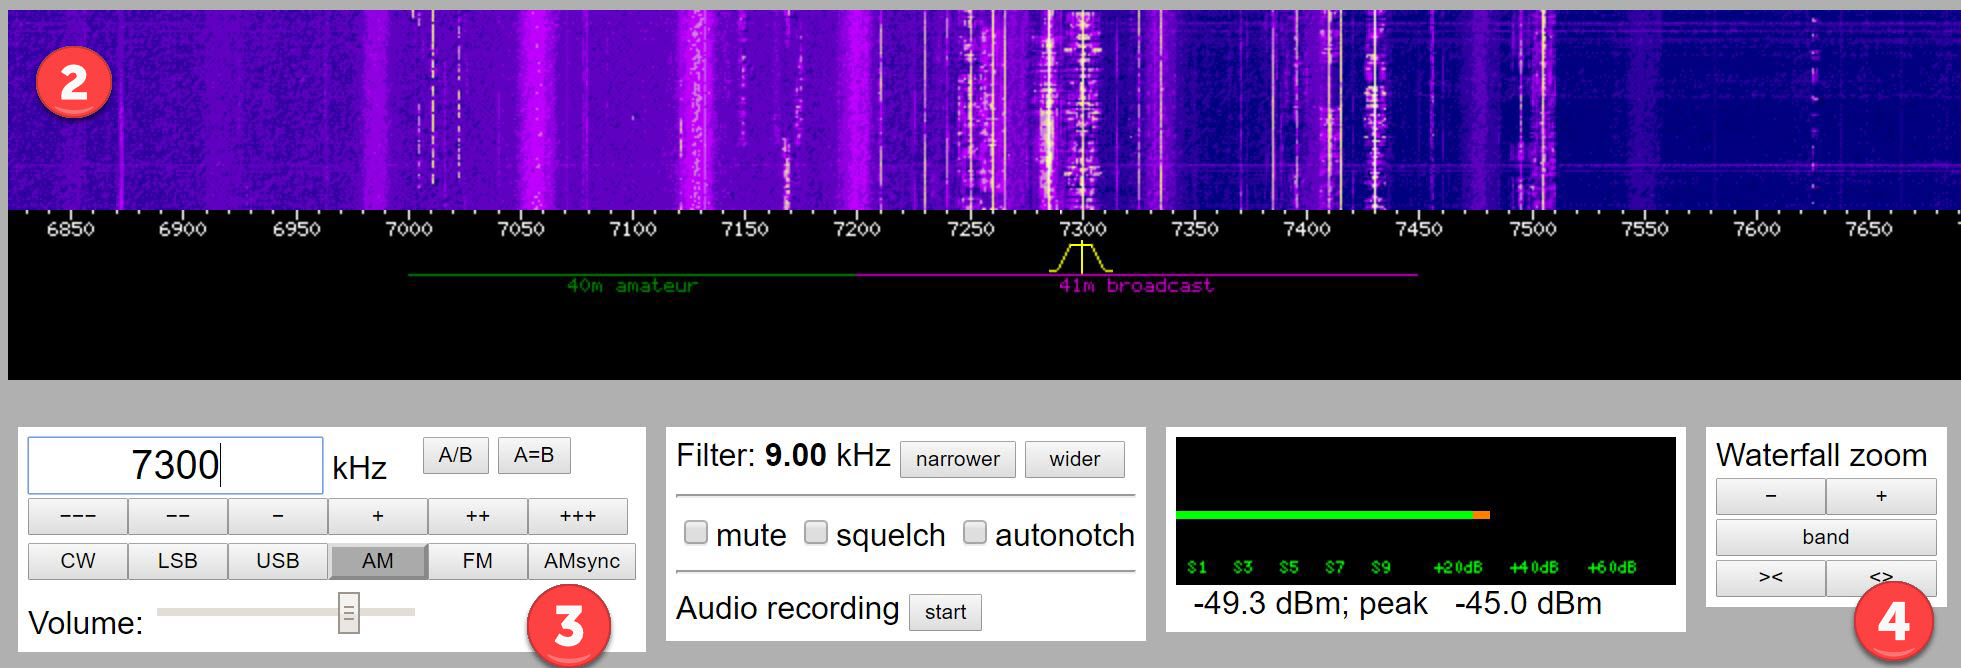 You’ll notice in the black space under the waterfall there are two frequency ranges marked out.
‘40m amateur’ in green and ‘41m broadcast’ in purple. This highlights where you can hear Amateur
Radio stations and commercial broadcast stations…there are many such ‘bands’ of activity and
details are included in the ‘Further Information’ section at the end of this guide. The bright and
sometimes fuzzy vertical lines on the waterfall are radio broadcasts. The brighter the line the
stronger the signal.
If you zoom in further (press the Waterfall Zoom❹ + control another 3 or 4 times) you’ll see
lots of orange markers appear. These identify the broadcast stations that have regular scheduled
transmissions on a frequency. These broadcast stations do not necessarily transmit 24/7 and
typically have scheduled transmissions in different languages depending on the target audience.
Evenings are a good time to hear broadcasts on this band.
If you’re not already able to hear a station reasonably clearly try dragging the yellow tuning indicator
left and right or use the +++ & --- tuning controls in ❸(note, if you try dragging the yellow tuning
indicator and it simply gets wider it’s because you’ve grabbed the wrong bit! Try and click on the top
edge of it and not the sides. If you do this simply press the AM button again to reset the size of the
tuning indicator). You may have noticed that when you selected the AM button the yellow tuning
indicator got much wider. Check it out, select LSB then AM and see the difference. This represents
the bandwidth of the received signal.
In the frequency range indicated by the purple zone (41m broadcast) you should see several bright
vertical bands on the waterfall. To tune into a station move the yellow tuning marker until it is
centred on the transmission (the bright vertical band). The width of the bright line scrolling up the
waterfall should be similar to the width of the yellow tuning indicator.
[Note: if you are not seeing any broad, bright lines like those in the picture above try again during
the evening when reception of broadcast stations tends to be better.]
In the image below we can see two stations; one centred on 7285kHz and one at 7300kHz.
You’ll notice in the black space under the waterfall there are two frequency ranges marked out.
‘40m amateur’ in green and ‘41m broadcast’ in purple. This highlights where you can hear Amateur
Radio stations and commercial broadcast stations…there are many such ‘bands’ of activity and
details are included in the ‘Further Information’ section at the end of this guide. The bright and
sometimes fuzzy vertical lines on the waterfall are radio broadcasts. The brighter the line the
stronger the signal.
If you zoom in further (press the Waterfall Zoom❹ + control another 3 or 4 times) you’ll see
lots of orange markers appear. These identify the broadcast stations that have regular scheduled
transmissions on a frequency. These broadcast stations do not necessarily transmit 24/7 and
typically have scheduled transmissions in different languages depending on the target audience.
Evenings are a good time to hear broadcasts on this band.
If you’re not already able to hear a station reasonably clearly try dragging the yellow tuning indicator
left and right or use the +++ & --- tuning controls in ❸(note, if you try dragging the yellow tuning
indicator and it simply gets wider it’s because you’ve grabbed the wrong bit! Try and click on the top
edge of it and not the sides. If you do this simply press the AM button again to reset the size of the
tuning indicator). You may have noticed that when you selected the AM button the yellow tuning
indicator got much wider. Check it out, select LSB then AM and see the difference. This represents
the bandwidth of the received signal.
In the frequency range indicated by the purple zone (41m broadcast) you should see several bright
vertical bands on the waterfall. To tune into a station move the yellow tuning marker until it is
centred on the transmission (the bright vertical band). The width of the bright line scrolling up the
waterfall should be similar to the width of the yellow tuning indicator.
[Note: if you are not seeing any broad, bright lines like those in the picture above try again during
the evening when reception of broadcast stations tends to be better.]
In the image below we can see two stations; one centred on 7285kHz and one at 7300kHz.
Image needed here
The width of the signal in the waterfall depends a little on the transmission…here the station on the left has someone talking and the station on the right is playing music Congratulations, you’ve just tuned in your first radio station on a WebSDR! Spend a moment to experiment…tune in other stations and see what you can hear. What does it sound like if the tuning indicator is not quite aligned with the line in the waterfall? Zoom in and out and use your mouse to drag the waterfall left and right to see different parts of the spectrum display.
If you're having any problems watch this short video.It demonstrates entering a frequency, selecting AM, zooming in on the waterfall and selecting different AM broadcasts either by dragging the yellow tuning indicator or by directly entering the frequency.
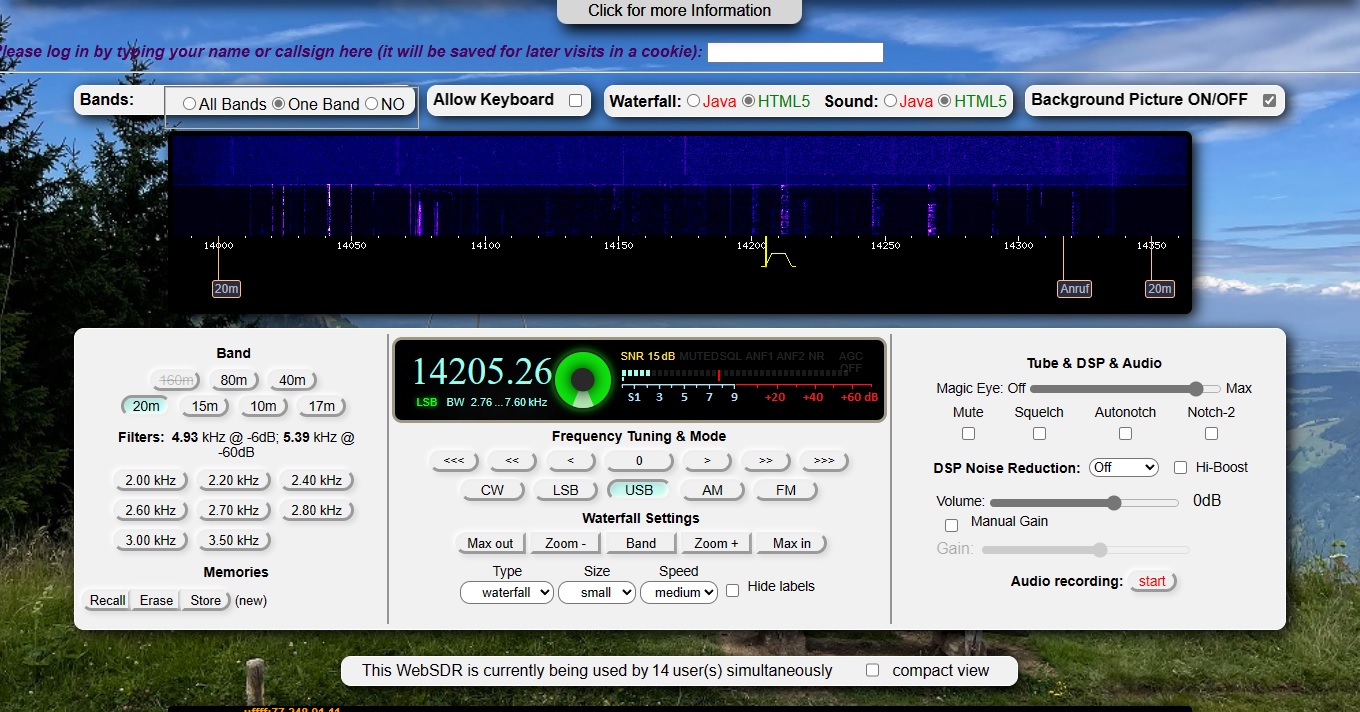
Listening to Amateur Radio transmissions
Now you’ve learned how to use the WebSDR receiver let’s find some Amateur Radio transmissions for you to hear. We’re going to look for voice conversations (Amateurs also use Morse code and a mix of historic and cutting edge data modes) and hopefully something in your native language. We’re going to try listening to the 40m amateur band as this is most likely to have activity at any time of the day. In the tuning control, ❸, type 7100 and hit enter. This will move the yellow tuning indicator to the frequency 7100kHz or 7.1MHz which is the middle of the 40m amateur band. Voice transmissions can normally be heard from 7050 – 7200kHz. Like business, English is the predominant language used where the Radio Amateurs are in different countries but Amateur Radio is a global interest and you can hear every language if you tune around long enough. If signals are present you’ll see they are a different size and shape to the broadcast stations. They are much narrower than your tuning indicator and far more sharply defined. This is because Radio Amateurs are using LSB on this band, a narrower bandwidth mode which concentrates their transmission energy into a smaller bandwidth. In the tuning control, ❸, select the LSB button and either use the + /- buttons or drag the yellow tuning indicator to align with a signal in the waterfall display. Do the voices sound like they’ve been inhaling helium or like they’re muffled/garbled? You’ll need to be much more accurate with your tuning compared to AM. These voice signals are roughly 2.4kHz wide and, to generate the most powerful signal while remaining intelligible, only a part of the normal voice range is used (say ~300Hz to 2700kHz) which means the voices you hear won’t sound deep and rich like they do on your local FM radio stations and, similarly, would sound awful if you tried to play music as there are no higher frequencies…Radio Amateurs are not permitted to broadcast music so this is never really an issue! Hopefully your display looks something like this (notice the little vertical bar in the yellow tuning indicator is aligned with the right-hand edge of the LSB signal)
Experiment by trying to select several different Amateur Radio transmissions and get used to adjusting the tuning indicator so the received voice is understandable. Hurrah, we’re listening to Radio Amateurs talking to each other…but what are they saying? There seems to be lots of letters and numbers and I can only hear one person talking The Radio Amateur Exchange First things first, the conversation you’re listening to now is what we call simplex which means only one person can talk at a time. This is because we’re using a single frequency and you are either transmitting or receiving…if you’ve ever used a walkie talkie or CB you’ll have experienced this. It’s possible that you may only be able to hear one side of the conversation if the second station is not also in range of the WebSDR receiver. A big part of Amateur Radio is the self-training in radio communications. This isn’t like talking on the phone where you can clearly hear the other person including when they laugh, mumble, gasp and whisper. Radio communication paths can be noisy, they can suffer interference from other transmissions or electrical noises, they’re narrow band (remember I said only a small range of the voice frequencies are transmitted) and the person you’re talking to may not share the same native language. To overcome this Radio Amateurs learn a specific way of communicating to ensure what they say is clear and understandable no matter what the reception conditions. Here is an example of what you might hear;
“Oscar Echo Four Hotel Delta Sierra this is Golf Zero Papa Oscar Tango. Many thanks for the call old man. The name here is Michael and the QTH is Thatcham, that’s Tango Hotel Alpha Tango Charlie Hotel Alpha Mike about 70km west of London. Your signal report here is five and seven, five and seven with some QSB. I wonder how you’re copying me? Oscar Echo Four Hotel Delta Sierra this is Golf Zero Papa Oscar Tango”
So what was that all about?!! “Oscar Echo Four Hotel Delta Sierra this is Golf Zero Papa Oscar Tango” You have to be ‘licensed’ to operate as a Radio Amateur. You first undertake some simple training and a basic exam to check your understanding and then you are issued a call-sign (in the UK this is issued by OFCOM). Your call-sign is unique to you and its prefix indicates your country. In the above example OE4HDS is a Radio Amateur from Austria being called by G0POT from the UK. When establishing a contact (and regularly throughout the exchange) the two stations will give their call signs to identify themselves (it’s a licencing requirement…broadcast stations have to do the same which is why they regularly play jingles with their station name every 30 minutes or more). But rattling off “OE4HDS” may be difficult for other stations to hear and understand therefore,
important but unusual words like call signs, names and locations you will hear stations spelling
them out using Phonetics
NATO_phonetic_alphabet Explained.
“Many thanks for the call old man”
That’s a bit rude isn’t it, calling him an old man? Actually, no…this is an endearing way to address
someone when you don’t know their name yet.
“The name here is Michael and the QTH is Thatcham that’s Tango Hotel Alpha Charlie Hotel Alpha
Mike about 70km west of London”
Typically the first things exchanged are ones name and location. If reception isn’t strong or if an
operator has an unusual name they will typically spell that out using phonetics. Most Radio
Amateurs use NATO Phonetics but you’ll hear lots of random words used when spelling words with
phonetics! QTH is another way of saying my location…there are many ‘Q codes’
Q codes explained.
Using Q codes can help when reception is poor or when you are speaking to someone who is not a native of your language. Only a small subset of Q codes are regularly heard in use. As we’re often in communication with people from outside of our country it can help to qualify ones location by indicating your position in relation to the capital or simply that you are in the north/south of the country. Amateur Radio is great for learning geography! “Your signal report here is five and seven, five and seven with some QSB” To help you understand how well you are being heard at the other end Radio Amateurs exchange ‘signal reports’. For voice communications this is usually two numbers (5 and 7 in this example). The first number is Readability (R) and is on a scale from 1 – 5. The second number is signal Strength (S) and is on a scale from 1 – 9. This approach to signal measurement is called RST RST codes explained.
the T or Tone part only applies when using Morse code. “I wonder how you’re copying me? Oscar Echo Four Hotel Delta Sierra this is Golf Zero Papa Oscar Tango” Just like the beginning of the ‘over’ at the end Radio Amateurs will typically exchange call signs again so that it is clear who is handing over to whom. Here the station is asking how he is being ‘copied’ e.g. he wants to know his signal report or RST. Go exploring I hope that has provided a basic guide to starting to listen to Amateur Radio (and Short Wave Broadcast radio) using WebSDR. See the tables below which list the other Amateur Radio bands on Short Wave along with the Broadcast bands. There are also links to many other information resources. If you have any questions about listening to Amateur Radio transmissions, about what you’re hearing or about how to find out more about Amateur Radio as a hobby then contact the author at Contact Michael G0POTIn future guides we’ll cover how to listen to data modes and Morse code Further information A useful list of alternative WebSDR websites an be found Alternative WebSDR websites You can find out more about Amateur Radio in the UK from the Radio Society of Great Britain at The RSGB (Radio Society of Great Britain isfull of information A list of call sign prefixes and the countries they relate to can be found at Many Radio Amateurs have a personal information page hosted at QRZ.com: Find out more about the station you have just heard.